Thursday, June 2, 2011

My Journey

The final list of all the regions I covered over the past 16 weeks are as follows:
  • Sicily
  • Sardinia
  • Liguria
  • Trentino Alto-Adige
  • Valle d'Aosta
  • Mozzarella Cheese & Ricotta Cheese
  • Lombardy
  • Emilia-Romagna
  • Piemonte
  • Campania
  • Tuscany
  • Basilicata
  • Molise
I still have one more final meal to cook and serve at my presentation, but I will be taking recipes from all different regions.  The knowledge I have gained not only about cooking, but about traditions and culture around food in Italy is huge.  This project has made me grow so much and I am grateful for every minute of it.

Thank you all for following my journey!

Tuesday, May 31, 2011

My Last Meal!!! (Molise)

One of the recipes that kept coming up while researching and looking in my cookbooks for Molise was capanata. Instead of using one of the many recipes I found for it, I asked my grandma to teach me her recipe (which was all just in her head), because she makes the best capanata in the world.

We started by cutting the eggplants into little cubes and frying them in oil. I learned that you need to continuously stir them, or they will burn.

Once the eggplant was done we set it aside and cooked the celery with tomato sauce and garlic. We turned the heat down and let it simmer for about ten minutes, so that the celery was still a little crunchy.

We mixed some sugar with white wine vinegar (my grandma would have preferred red wine vinegar but it was the only kind we didn't have) and put it in the microwave for about 10 seconds, just so that the sugar dissolved. We added this to the pan, along with the eggplant, capers and pine nuts.


The next step of the meal was to make the pasta. I was very excited to make this pasta because I found special "pasta flour" at Wegmans that is a mixture of durum wheat and semolina.
To form the cavatelli, which is a typical pasta of Molise, I rolled out ropes about the same diameter as a pencil. I then cut the ropes into cylinders that were a little less than an inch long.

I then placed my fingers on the cylinders and pulled the dough towards myself to make it curl up. This was the most challenging pasta shape I have made so far, which is funny because the book says it is simple and even children can make it. Luckily it isn't crucial for it to be perfect like with the tortellini. The dough was also very sticky, so I had to repeatedly flour my hands and the work surface throughout.

To make the bread crumbs I grated day old bread and toasted it with oil and garlic in a pan.
\
I then boiled the pasta and cauliflower together, added the pasta a little later so they were done at the same time.

I put everything in a bowl with some chopped almonds and parsley, and it was delicious!


I had hoped to make some sort of desert from Molise, but every desert recipe involved baking and it was 90 degrees outside, and about 85 degrees in my kitchen the day I cooked from Molise so I decided not to.


Friday, May 27, 2011

Basilicata and Cooking with Grandma

The first step to this meal was shelling the fava beans. It took a really long time, but it was actually kind of relaxing and enjoyable.
Once they were all shelled I had to blanch them until they turned bright green, which they never really did so it was difficult to tell when they were done. As soon as I took them out of the boiling water I dumped them into an ice bath to stop the cooking and make the skins easier to peel off.
The water I blanched them in turned this bright red color, which I thought was really interesting because no part of a fava bean is red.  
Once they were blanched I had to peel the inner skin off of them. At this point my grandma came in to help me and shared a story about the favas. She said that her uncles and dad used to soak fresh favas in salt brine and then snack on them while drinking beer, snacking on the excess favas with me reminded her of this.

Before cooking the artichokes I soaked them in lemon water for about half an hour. I then cooked them with onion in a large pan for almost an hour.
Last time I boiled potatoes I took them out way before they were done, so this time I had grandma help me. As she was slicing them I set a big piece of cheese on the cutting board next to her and she broke off a chunk and said "you should never put Parmigiano in front of an Italian grandmother."

When the artichokes were almost completely cooked I added the favas and potatoes and let them all cook together until the potatoes were a little bit crispy. Meanwhile I started the sauce for the pasta. I simmered oil, salt, sliced garlic, and parsley together, and added a little water from the pasta pot.

I had mixed the halved cherry tomatoes with olive oil, bread crumbs and salt before baking them, and this picture doesn't do these tomatoes justice. When I took them out of the oven they were extremely bright and shiny, and they looked almost like jewels.

I added the tomatoes and some shredded basil to the pasta, and on every ones plate we added a little ricotta. This was one of the best pasta dishes I have made so far, I only wish I had used homemade pasta.

Wednesday, May 25, 2011

Basilicata Menu

This week I am using Lidia Cooks From The Heart of Italy. The menu for Basilicata is as follows:
  1. Pasta con Pomodori al Forno (Pasta with Baked Cherry Tomatoes)
  2. Ciaudedda (Artichokes, Fresh Favas, and Potatoes)
  3. Torte alla Prugne (Torta with Prunes)

Friday, May 20, 2011

Tuscany With My Sister

Instead of making the menu that I found in Cooking With Italian Grandmothers, my sister Sarah (who spent time in Tuscany 2 years ago) and I made a meal together that she planned out. We made stuffed artichokes, polenta with rosemary and bay leaves, and a simple salad.  Instead of baking the artichokes after stuffing them, we steamed them in a big pot. It was a very long process but they tasted delicious! Sarah has always been much better at cooking than me and I call her all the time for advice, but I actually got to help her out thanks to this project. She didn't know how to make polenta, and I learned how while making my meal from Valle d'Aosta, so for the first time ever I got to teach my sister something about cooking!

Thursday, May 19, 2011

Tuscany Menu

For my Tuscan meal I am going to use my Cooking with Italian Grandmothers cookbook. There are two grandmothers from Tuscany featured in this book. Mary has a variety of recipes, while Bruna has three recipes for cooking rabbit. From Mary's recipes I chose the following:
  1. Pappa al Pomodoro (Tomato-Bread Soup)
  2. Patate Arrosti con Rosmarino (Roasted Potatoes with Rosemary and Olive Oil)
  3. Carciofi (Baby Artichokes with Garlic, Herbs, and Wine)

Cooking with Grandma

Last night I got the chance to cook dinner with my grandma.  We made chicken cacciatore, which I didn't eat any of, but it was still a lot of fun to cook with her. 

Thursday, May 12, 2011

Campania

The first dish in this meal was the stuffed eggs. Surprisingly enough, I didn't know how to hard boil eggs before this and my mom had to tell me how long to put them in the water for. Once they were done, I cut them in half and removed the yolks. I mixed the yolk with ricotta, nutmeg, parmigiano, salt and pepper, and replaced the original yolks with this mixture.
I was nervous about breading and frying the eggs, because I didn't think they would hold together through this process, but the yolk mixture stuck the two halves together perfectly and the frying went very smoothly. The eggs were delicious!

The rice used in the timbale was cooked in a very interesting way. I cooked it in boiling water and then drained it like you would with pasta. I then mixed a lot of butter and parmigiano in with the rice. I thought it was interesting that I buttered the bottom of the baking pan and then coated it in breadcrumbs, it made the edge pieces crispy and delicious. If I was going to make this again I would use a smaller baking pan, because I didn't have enough of the rice or zucchini to make 2 complete layers of each. I would also put less butter in with the rice, because it turned out to be a very oily dish.
To make the orange custard I stirred milk, sugar, cornstarch, and egg yolks together on the stove until a pudding texture formed. This was a very tedious process for me because I got impatient after the first 5 minutes of continuous stirring. It was shocking to me how suddenly it thickened.
Once the custard was done, I added orange zest and fresh squeezed orange juice. The oranges I used must have been particularly juicy, because if I had used the juice from all four it wouldn't have been thick enough. I then let it cool in the fridge. We were too full to eat it after the eggs and timbale, but it was an excellent breakfast!

Wednesday, May 11, 2011

Campania Menu

 My Menu:
-Sartu di Riso alla Morconese (Rice Timbale)
-Uova alla Monachina (Stuffed Eggs)
-Crema di Arance (Orange Custard)
All of these recipes originate in Napoli, which is the capitol of Campania and where my grandma's father is from. 

My Shopping List:
  • breadcrumbs
  • butter
  • rice
  • parmigiano
  • olive oil
  • 1 lb zucchini
  • 1 lb mozzarella
  • eggs
  • milk
  • 4 organic oranges
  • heavy cream
  • candied orange

My 4 Week Plan

I set the date for my presentation yesterday, and it will be Wednesday, June 8th.  This gives me 4 more weeks to work on my project.  After researching Umbria, which I had planned to cook from next, I found that they cook their meat and vegetables together.  I couldn't find a balanced vegetarian meal from Umbria in any of my four cookbooks, so I have decided to switch the region I'm cooking from this week to Campania. The regions that I still need to do are Campania, Tuscany, Molise, and Basilicata. My plan is to finish all of these by June 1st, which will leave me a week to prepare my final presentation.

Thursday, May 5, 2011

Piemonte Meal

The first step of this meal was to make the Gnocchi dough.  I simmered milk and then slowly added the semolina flour while whisking it. Once the flour was all mixed in, I added parmigiano cheese, eggs, and butter. I then spread the dough out in a baking pan so it was about 1/2 inch thick, and put it in the fridge for an hour. Once the dough was cool I cut out circles and placed them on a parchment lined baking sheet. I added breadcrumbs and more parmigiano to the top and baked them for about 45 minutes. It was MUCH easier than making pasta!
Once I had the Gnocchis in the oven I started to make the green "inside and out" salad.  To make this salad you are supposed to use Puntarella, which is a type of chicory, but Wegmans doesn't carry chicory, so instead I used dandelion greens to replace the outer leaves and baby frisse to replace the inner leaves. I thought it was interesting that to steam the dandelion greens it said to simply not dry the greens after washing them instead of adding water to the pot. After steaming them I added lemon juice and olive oil. To garnish it I added toasted walnuts, which I didn't burn for the first time in my life! For the "inside" salad I made a dressing of lemon, anchovies (only on my dad and grandma's) olive oil and salt. It was fairly simple and really good!

The next dish that I made was actually the first to be served.  Making the garlic anchovy dip was not fun for me, because I had to finely mince a lot of anchovies and the smell was horrible. I also had to peel three whole heads of garlic which was pretty time consuming.  I boiled the garlic, and then mashed it into a paste, and heated up the anchovies, garlic and olive oil in a saucepan. The recipe called for cardoon to dip in the sauce, which I couldn't find, so I used the stems of artichokes instead. I boiled them in the water left over from the garlic and they were delicious.  I made a version both with and without anchovies, and my dad claims the anchovies made it much better but I refused to try it.


This was my first dessert that went as planned and tasted great. I caramelized the pears in lemon juice and sugar, and after about an hour added the almonds and prunes for 20 minutes. I have always had trouble whipping cream, and went a little past "soft peaks" as the recipe called for, but the cream melted in with the caramel sauce and tasted delicious. I was very happy with this meal!

Tuesday, May 3, 2011

Piemonte Menu

I am using my new cookbook Cooking with Italian Grandmothers this week. The grandmother from Piemonte, Irene, has two full menus in the book. I chose her first menu which is as follows:

  1. Bagna Cauda (Piedmontese Warm Garlic-Anchovy Dip)
  2. Gnocchi di Semola (Semolina Flour Gnocchi)
  3. Insalate di Puntarella (Puntarella Salad, Inside and Out)
  4. Pere Madernasse con Mandorle e Prugne (Caramel-Poached Pears with Prunes, Almonds, and Cream)

Sunday, May 1, 2011

New Cookbooks

I recently got two new Italian cookbooks that I plan to use in my project. The first one is The Italian Farmer's Table which is a collection of seasonal and regional recipes from Italian farmers put together by Matthew Scialabba and Melissa Pellegrino. The other book is Cooking with Italian Grandmothers, by Jessica Theroux. Jessica spent a year in Italy talking to the Italian grandmothers and collecting the recipes in this book. I am excited to work from both of these new books!

Friday, April 29, 2011

Region Change

I recently found out where one of my two Italian Grandmas is from, and the region she is from (Piemonte) is not on my list.  The idea behind this project came from learning more about my family's history, so I am taking Abruzzo off the list and adding Piemonte.

Emilia Romagna


The first course of this meal was the Sweet and Sour Little Onions.  Pealing the onions was by far the hardest part of this dish.  The goal was to keep the onions intact, and it was very time consuming.  Once they were all pealed I boiled them for about 20 minutes, so they were cooked but not falling apart. I then strained the water, and patted the onions dry with a towel.

                                      
I then caramelized the onions in sugar and balsamic vinegar and they were delicious!

I'm getting much better at making pasta dough, so it wasn't very difficult for me this time.  When the recipe says add water or oil in small amounts until it is the correct consistency, I actually know what it means now!

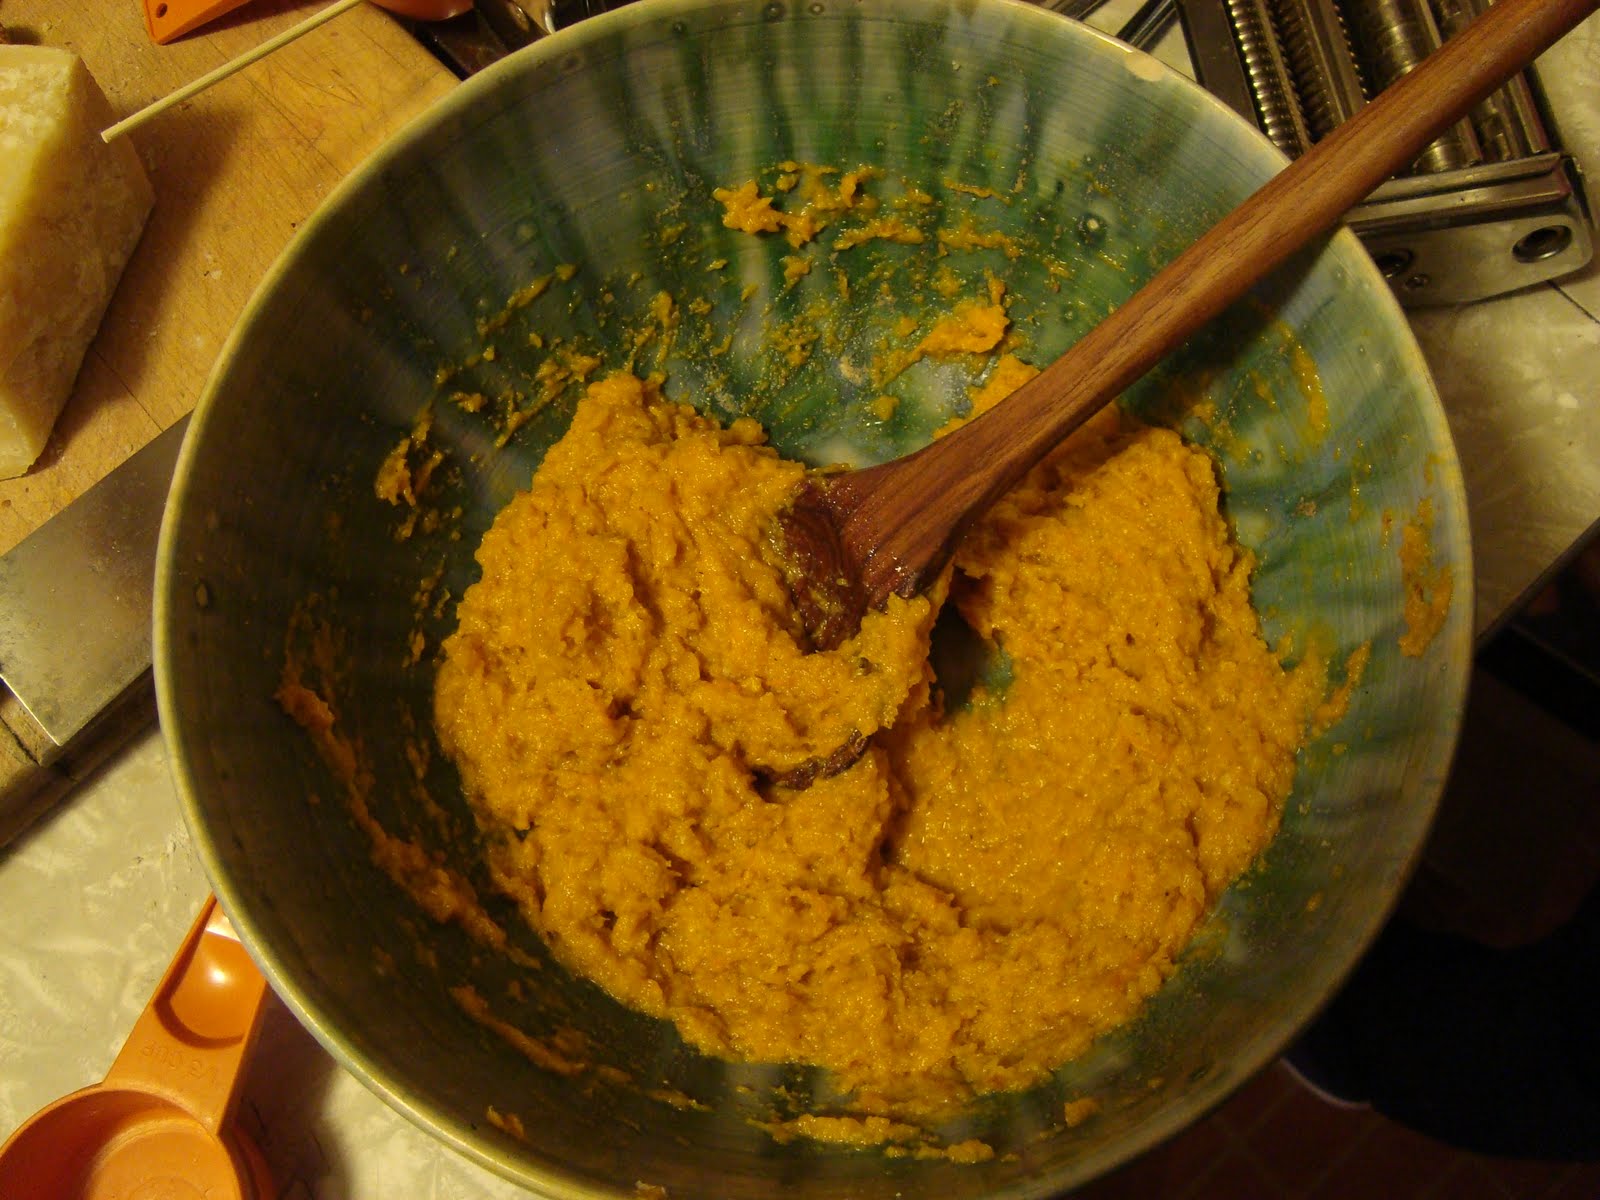
After baking the squash coated in salt, I had to squeeze it in a cloth to remove all of the excess liquid. This was an important step because the liquid would lead to soggy cappellacci. I didn't have the appropriate cheese cloth, so I just used a dish towel, which made it take a little longer than it should have.
To make the filling I mixed the squash, nutmeg, parmigiano cheese, zest of a lemon and egg until it was a smooth consistency.
I used the pasta maker to roll out this dough, and my dad helped me to finally master it. He taught me that the cause of the bubbles in previous pastas I have made with this machine is that I start on too high of a setting. You need to start with the thickest possible setting, and work your way down to the thinnest on each strip of pasta you make. To form this pasta I made two strips of relatively equal size at the same time.  On the first strip I placed small amounts of the filling spaced out across it, and then wet a circle around each pile with water. (So the second strip sticks better)  I then used my make shift pasta cutter (the top of a tea can) to cut through both strips at the same time around each pile of filling.

To shape the cappellacci I folded each circle in half, folded the dough around the ball of filling in the center, and twisted the ends together to seal it. The first few times I tried I folded it the wrong way, so instead of forming a circle around the ball of squash, the dough was all on one side, and the pocket of filling was on the other. I realized that that's not what cappellacci looks like, so I started making it correctly.

To dress the pasta I made sage butter, which is just as it sounds: butter melted with sage in it.

After the pasta was cooked, I strained it and placed it in the pan of butter. This flavors in this dish reminded me of pumpkin ravioli that I have had at Zaza's Cucina (the family who owns it come from Emilia Romagna) only it was better because I had made it myself!
The first step to making the almond cake was baking chopped up almonds and sugar.  I left it in the oven a little bit too long, and the melted sugar was pretty hard to get of the baking sheet, but I didn't burn it which was a success.
I have never been fully successful with my deserts in this project, and this one was no different. It tasted ok but it was crumbly and very hard at the same time.  There was a lot of lemon zest in it, which added a lot of great flavor, but it was a little too sweet for my taste.

This meal was incredibly time consuming, but it was well worth it because it was all delicious!

Emilia Romagna Menu

Some of the most well known Italian foods come out of Emilia-Romagna. These foods are used all over the world, and attempts to duplicate them are often made to no avail.
Some of the world famous Emilia-Romangnian foods are:
  • Parmigiano-Romano (Parmesan Cheese)
  • Prosciutto
  • Balsamic Vinegar
  • Totellino and Cappellacci (I can't really find a difference)
  • Bologna
My menu for Emilia Romagna is as follows:
  • Sweet and Sour Little Onions
  • Cappellacci with Squash and Sage Butter
  • Almond Cake

Wednesday, April 13, 2011

Progress

Regions covered so far:
  1. Sicily
  2. Sardinia
  3. Liguria
  4. Trentino-Alto Adige
  5. Valle d'Aosta
  6. Lombardy
  7. cheese making day
  8. Emilia-Romagna (this week)

Regions I still need to cover:
  1. Basilicata
  2. Molise
  3. Abruzzo
  4. Umbria
  5. Tuscany

Thursday, April 7, 2011

Ricotta Cheese

The ricotta cheese worked very well for me. The recipe is a lot simpler than the mozzarella recipe, and there is less room to mess it up. You heat the milk, citric acid and salt to 195 degrees, and the curds that it forms are much smaller than those in the mozzarella.
I then hung the curds over my sink in a cheese cloth for about 45 minutes to drain the excess whey.

The resulting cheese was delicious. It was creamy and not too salty like some store bought ricottas. I was very happy with the way it turned out. I'm not sure what I want to do with it yet, but my dad says it would be perfect for cannoli.

Mozzarella Cheese

The first step was to heat the milk up and add citric acid and rennet. It formed these curds that look a little like yogurt.

I then ladled the curds out, and pressed out the excess whey.

I placed the curds in a bowl, and poured 180 degree whey over them to melt the curds. I then used spoons to push the curds into one large curd, and picked it up out of the water. At this point you are supposed to be able to stretch the mozzarella but mine broke apart, so I decided to break it into two smaller curds and try with hot why again. This part of the process was frustrating for me because it never really stretched, no matter how hot the whey was.
Once I had stretched it to the best of my abilities, I formed it into little balls and placed them in cold water.

The end product was tasty, but not as smooth as mozzarella usually is.

We used it on pizza for dinner. It only melted on one of the two pizzas, but it tasted great on both!